Blanch Your Basil: The Key to Beautifully Green Pesto That Lasts
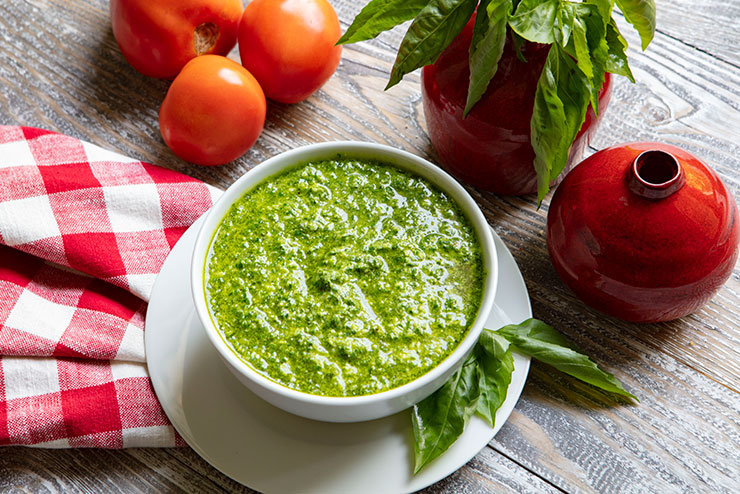
There's nothing quite like the vibrant burst of fresh, homemade pesto. The aromatic blend of basil, garlic, pine nuts, Parmesan, and olive oil can elevate a simple pasta dish, soup, or sandwich into a culinary masterpiece. Yet, many home cooks face a common, disheartening challenge: their beautifully green pesto often turns an unappetizing shade of brown within hours or days. If you've ever found yourself wondering, "pesto how to make beautifully green pesto that actually *stays* green," you're in the right place. The secret lies in a simple, often-overlooked technique that will revolutionize your pesto game: blanching your basil.
Forget dreary, olive-green pastes that hint at oxidation. With a little scientific understanding and a straightforward preparation trick, you can consistently achieve that brilliant, emerald hue reminiscent of a sun-drenched Italian garden. This guide will walk you through not just the magic of blanching, but also other clever tips to ensure your homemade pesto remains stunningly vibrant and bursting with fresh flavor, whether you're serving it immediately or freezing batches for later enjoyment.
The Science Behind Brown Pesto: Why Does It Happen?
Before we dive into the solution, understanding the problem is key. Why does fresh basil, so verdant and full of life, inevitably succumb to an unappealing brownish-green? The culprit is a natural enzymatic reaction called oxidation. Basil leaves, like many fruits and vegetables, contain enzymes, primarily polyphenol oxidase (PPO), and compounds called polyphenols. When the basil leaves are torn, bruised, or chopped, these enzymes are exposed to oxygen in the air. This interaction triggers a chemical process that causes the polyphenols to oxidize, resulting in the formation of dark pigments. Think of how an apple browns after being cut – it's the same principle at play.
The vibrant green color of basil comes from chlorophyll. While blanching helps to set this color by disrupting cell walls, its primary role in preventing browning is to deactivate those pesky PPO enzymes. By briefly subjecting the basil to high heat, you effectively denature these enzymes, rendering them inactive. Without the enzymes to catalyze the oxidation, the basil's beautiful green color is preserved, even after it's processed into pesto. This tiny investment of time makes a monumental difference in the visual appeal and lasting freshness of your homemade concoction.
Blanching Your Basil: The Game-Changer for Vibrant Pesto
Blanching is a culinary technique involving a quick dip in boiling water followed immediately by an ice bath. While it might seem like an extra step, it’s arguably the most crucial one for achieving and maintaining that gorgeous, bright green color in your pesto. The process is swift, typically taking less than a minute, and yields dramatic results.
Step-by-Step Guide to Blanching Basil for Beautifully Green Pesto
Here’s exactly how to blanch your basil to lock in that vibrant hue:
1.
Prepare Your Ice Bath: Before you even think about boiling water, fill a large bowl with ice water. This "shock treatment" is critical for immediately stopping the cooking process after blanching, preventing the basil from overcooking and losing its color. Set it aside within easy reach of your stovetop.
2.
Boil Water: Bring a large pot of water to a rolling boil. Ensure there’s enough water to fully submerge your basil without significantly dropping the water temperature when you add the leaves.
3.
Add Basil and Blanch: Carefully add your fresh basil leaves to the boiling water. Use a slotted spoon or tongs to gently push the leaves down, ensuring they are fully submerged. Keep a close eye on them – you’ll see them turn an even more vivid green almost instantly. This process should take no more than 15-30 seconds. The moment they turn bright green, they're ready. Do not let them cook longer, as this will result in nutrient loss and a duller color.
4.
Immediate Ice Bath: Using your slotted spoon, swiftly transfer the blanched basil directly into the prepared ice bath. Swirl them around for a minute or two until they are completely cold. This rapid cooling halts the cooking process, preserving the vibrant color and crisp texture.
5.
Thoroughly Dry: Once chilled, drain the basil in a colander. Then, and this is a critical step, spread the blanched basil leaves onto a clean kitchen towel and pat them as dry as possible. Excess water can dilute your pesto and affect its texture, so be diligent here. Gently pressing another towel on top can help absorb more moisture.
Beyond Blanching: Elevating Your Pesto's Emerald Hue
While blanching is the cornerstone of beautifully green pesto, there are a few other clever tricks that can amplify its vibrancy and extend its fresh appeal. These additional steps, when combined with blanching, ensure your pesto is not just green, but truly emerald. You can learn more about these techniques in our article:
Beyond Blanching: Spinach & Lemon for Emerald Green Pesto Perfection.
*
Introduce Baby Spinach: For an extra boost of green without altering the classic basil flavor profile, consider adding a handful of baby spinach leaves to your pesto. Spinach contains chlorophyll and, like basil, benefits from blanching (though it can also be added raw for a subtle freshness boost if using with blanched basil). It’s an excellent way to use up wilting spinach and enhances the overall emerald factor.
*
A Splash of Lemon Juice: A few drops of fresh lemon juice, added at the very end of the preparation (especially if you're not freezing it), can do wonders. Lemon juice is acidic, and acid helps to stabilize the chlorophyll, further locking in that bright green color. Beyond its visual impact, it also adds a zesty brightness that truly makes the pesto taste "greener" and fresher, cutting through the richness of the oil and cheese.
*
Use Quality Extra Virgin Olive Oil: The quality of your olive oil matters immensely, not just for flavor but also for its natural color and smooth texture. A good quality, slightly greener extra virgin olive oil can contribute to the overall vibrancy of your pesto.
Crafting Your Masterpiece: The Full Pesto Recipe with Green-Boosting Techniques
Now that you're armed with the secrets to stunningly green basil, let's put it all together into a comprehensive recipe for beautiful, lasting pesto. This recipe makes about 2 cups, perfect for immediate use or freezing in batches.
Ingredients:
* 6 cups (lightly packed) fresh basil leaves, blanched and thoroughly dried (approx. 120g)
* Optional: Up to 1 cup baby spinach leaves, blanched and dried
* ¾ cup toasted pine nuts
* 6 large garlic cloves
* ½ teaspoon sea salt, plus more to taste
* 1 cup extra-virgin olive oil
* 1 ½ cups freshly grated Pecorino Romano cheese (preferred) or Parmesan
* Lemon juice, to taste (approx. 1-2 tablespoons)
Preparation:
1. **Blanch and Dry Basil (and Spinach):** Follow the blanching steps outlined above for your basil leaves. If using spinach, you can blanch it along with the basil or separately, then combine and pat dry thoroughly. This foundational step is paramount for a beautifully green pesto.
2. **Combine Solids:** In a food processor, combine the blanched and dried basil (and spinach, if using), toasted pine nuts, garlic cloves, and ½ teaspoon of salt. Pulse the mixture until it is finely chopped and begins to come together. Scrape down the sides of the bowl as needed.
3. **Emulsify with Olive Oil:** With the food processor running, slowly drizzle in the extra-virgin olive oil in a steady stream. Continue processing until the pesto reaches a smooth, consistent texture. Avoid over-processing, which can warm the pesto and dull its color.
4. **For Immediate Enjoyment (Add Cheese & Lemon):** If you plan to use the pesto right away, add the freshly grated Pecorino Romano (or Parmesan) and lemon juice to the food processor. Pulse very briefly, just until combined. Taste and adjust seasoning, adding more salt or lemon juice if desired, or a bit more olive oil if you prefer a thinner consistency.
5. **For Freezing (Omit Cheese & Lemon):** If you are making pesto to freeze for later, **do not** add the cheese or lemon juice at this stage. Freezing cheese can sometimes lead to a grainy texture upon thawing, and lemon juice’s acidity can be less stable over long freezer storage. You'll add these fresh ingredients later, once the pesto has thawed. For detailed freezing advice, check out
Stop Brown Pesto: How to Keep Your Homemade Pesto Bright Green for Days.
Storing Your Emerald Pesto
To ensure your vibrant pesto stays beautifully green for days in the fridge, transfer it to an airtight container and pour a thin layer of olive oil over the surface. This creates a barrier against oxygen, significantly reducing oxidation. For longer storage, divide the cheese-free pesto into freezer-safe containers, small jars, or even ice cube trays. Once frozen solid, transfer cubes to a freezer bag. When ready to use, thaw in the refrigerator, then stir in your fresh grated cheese and a squeeze of lemon juice.
Conclusion
Achieving that elusive, beautifully green pesto is no longer a culinary mystery. By embracing the simple yet powerful technique of blanching your basil, you unlock a world of vibrant color and sustained freshness. This tiny extra step, coupled with smart additions like baby spinach and a touch of lemon, ensures your homemade pesto doesn't just taste incredible but looks every bit as appetizing as it should. So, gather your basil, set up your ice bath, and prepare to elevate your pesto game from good to absolutely glorious. Enjoy the satisfaction of serving a truly stunning, emerald-green creation that will impress both your eyes and your palate!